

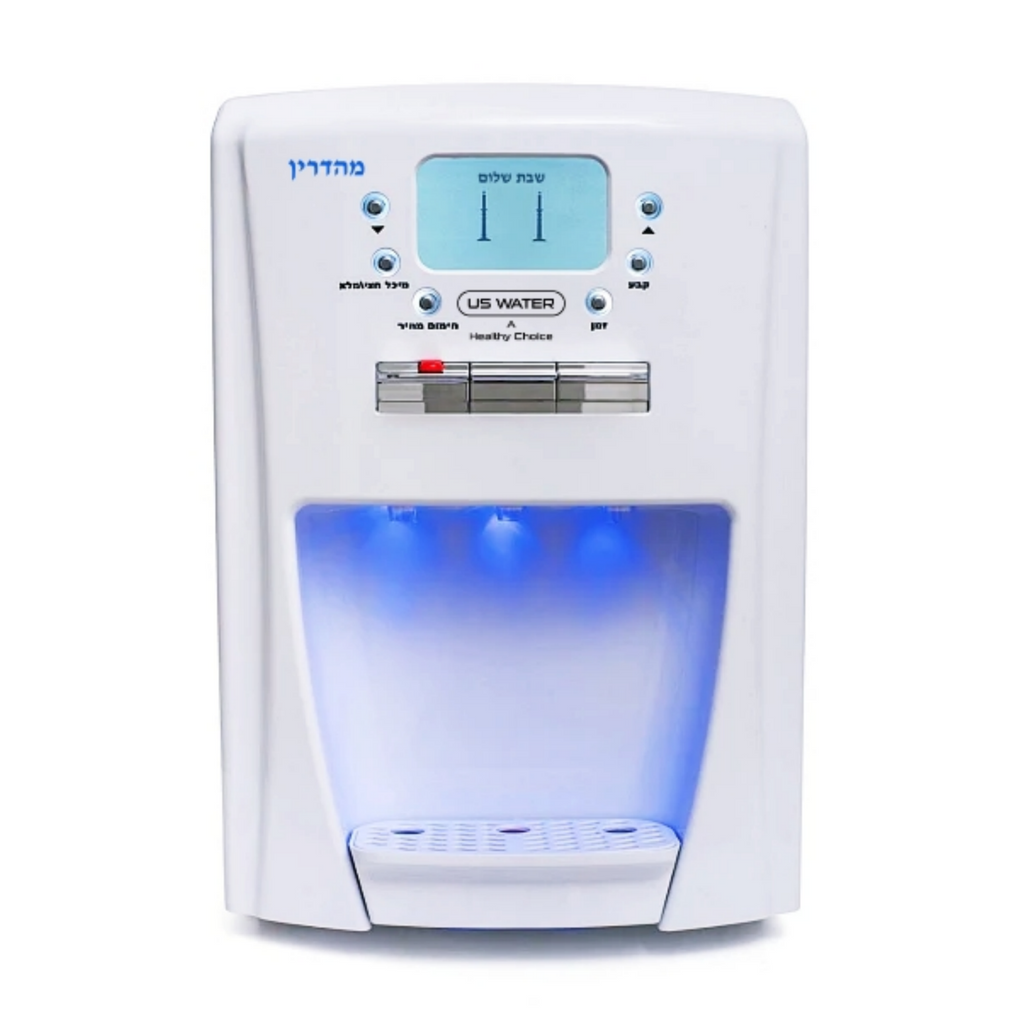


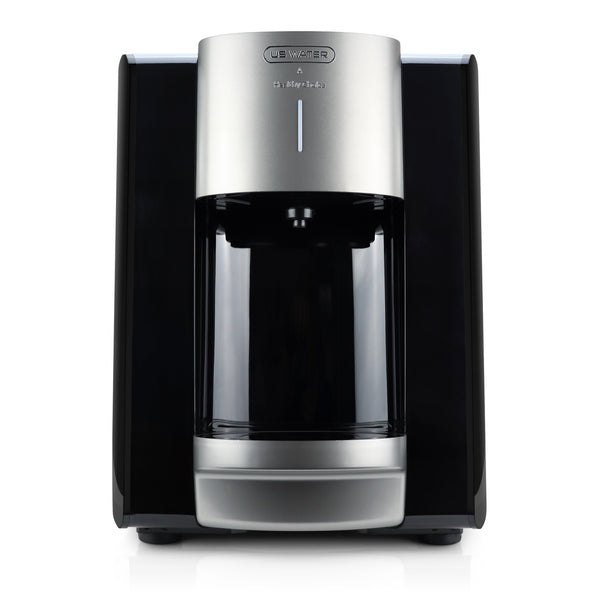
US Water
Water Dispenser - Noga Shabbat
• Heavy use water dispenser.
• Provide 7 liters of hot water and 3 liters of cold water.
• Unique technology that forms ice and cools immediately the incoming water.
• Developed specifically for those who wish to keep Shabbat.
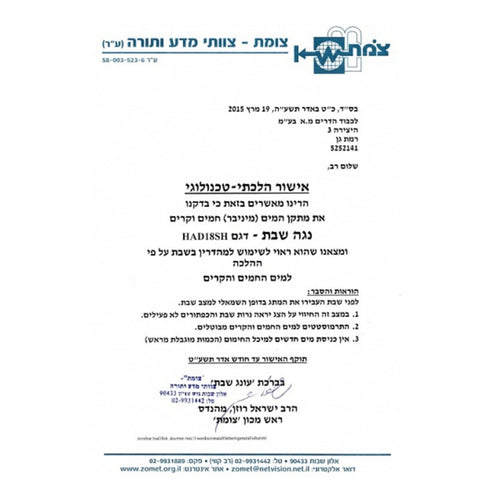
• Certified by Tzomet institute.
• All of our products support your health and a healthy green world.
• Unique filter system.
• Clean and elegant design.
• Simple and friendly operation.
• LCD Display.
- Product Description
- Video
- Reviews
- Apply for Lease
Safety Instructions, Operation, and Installation For a model water dispenser
NOGA-SH-241206
Noga Shabbat
River Stream ltd., 2 Hatzirah St. Ramat Gan, phone 03-9044400
Marketer: Clear Water Purification and Filtration Ltd. 5 Zvi Bergman St. Petah Tivka
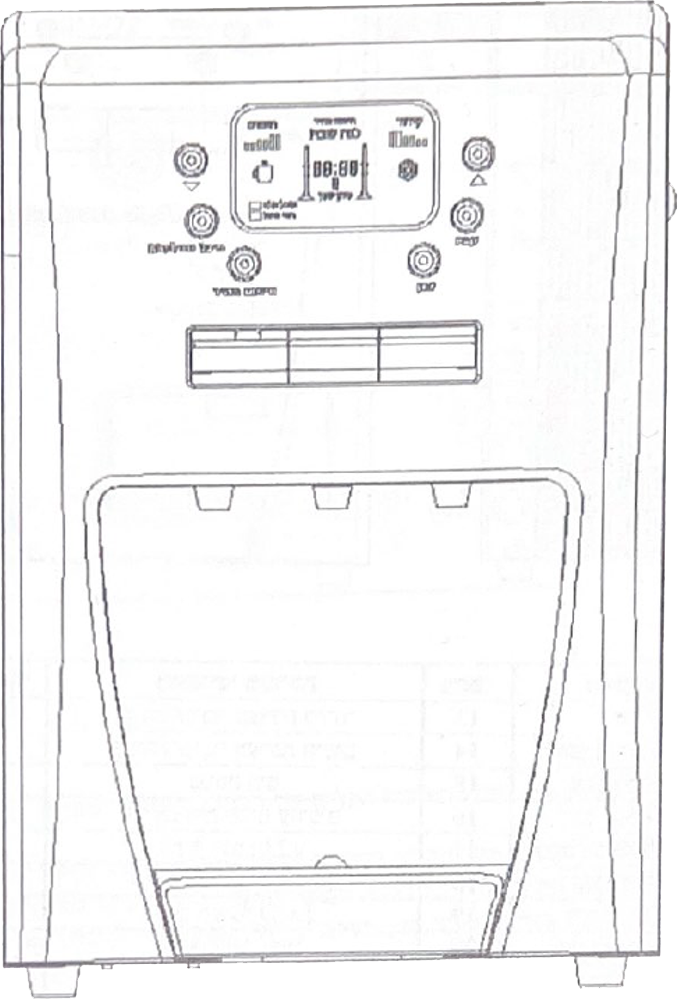
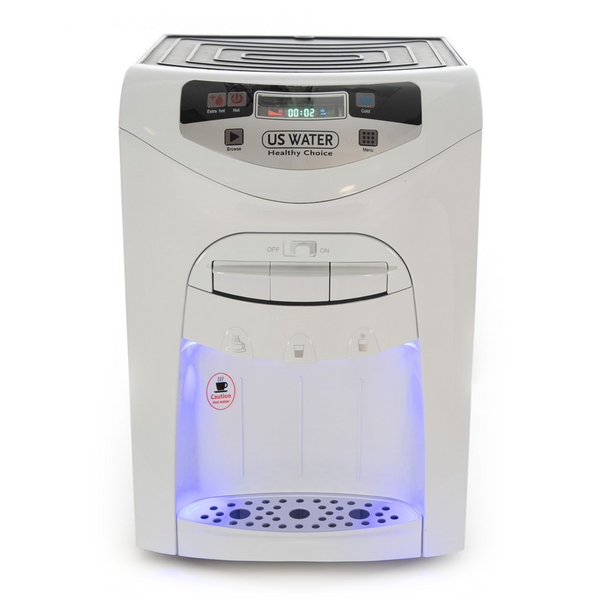
System Parts:

- System Properties:
- Turn on/off cooling system
- Turn on/off heating system
- Water inlet
- Excess cold water outlet
- V230 feeder fuse
- Excess hot water outlet
- LCD display screen
- Down Direction button
- Up direction button
- Half full hot water tank setting button
- Quick heating button
- Temperature and time setting button
- System Properties
- Time setting button
- Shabbat/Normal mode switch button
- Cold water button
- Button for lukewarm water
- Protection lock for hot water button
- Hot water button
- Spout for cold water
- Spout for lukewarm water
- Spout for hot/boiling water
- Marking float for surplus tray
- Leftover tray
System Properties:
- This system is for supplying hot and cold drinking water. Regarding the installation, the product has a water point and an electricity point.
- This system is easy to maintain and service.
- This system is equipped with an efficient and powerful compressor.
- This system is an efficient and unique supply system for supplying hot water and coldwater on Saturdays and on weekdays.
| Hot water temperature C - 80 C 96 degrees | Working voltage: 230V-5o Hz |
| Cold water temperature 7C-15 degrees | Moisture Standard: IPX1 |
| Ambient temperature C - 10C 38 degrees | Gas type and weight: R134a/29gr |
| Power consumption while working heating system: 1200 W + 60W(PC) | Climate class 1+-43 degrees Celsius Class T |
| Power consumption while working cooling system W90 | Water pressure: 3 bar/ 0.3 Mpa |
| General power consumption: W1290 | Cold water tank volume: 3.5 liters Hot water: 7.2 liters |
This is a system for heating and cooling drinking water, removing taste, and smell, and removing 75% chlorine.
Operating Instructions:

Heating:
- Turn on the heating switch located on the upper rear side of the device, the word “Heating” will
appear on the screen, this symbol will flash and become static when the heating process is finished and will turn into heat preservation mode.

- Hot water temperature setting: Press the “Set” button and hold for 10 seconds, the hot water
temperature symbol will flash on display. Now press “Up arrow”, “Down Arrow” to set the hot
water temperature. The hot water temperature options are 87℃, 91℃ & 96℃ which will be
shown in the markings on the display screen. After setting the temperature, press the “Set” button
again to switch to cold water and press the “Set” button again to save the selection. (If there is no
operation for 20 seconds in the ‘setting’ mode, the last mode will be saved automatically.)

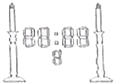
- When selecting a temperature option:
- 87 ℃, the 2 smallest lines will be displayed on the LCD screen
- 91℃, the 2 medium lines will be displayed on the LCD screen
- 97℃, the 2 highest lines will be displayed on the LCD screen.
When selecting a desired temperature, this marking will flash until the water has reached the desired
temperature and then the symbol will become static.
Installation Instructions:
- The water dispenser must be placed in a flat and dry place.
- This device is intended for use inside a closed building, the system must be placed in a shaded place protected from the sun.
- The device must be placed at a distance of at least 20 cm from the back wall.
- It is recommended to install the system in a place far from other electrical products to avoid unexpected damage such as flooding or overheating
- To prevent heat absorption of heat from a nearby product, a pressure reducer must be installed before connecting the water (mandatory). Please note that this system does not withstand water pressure above 3 bar / 1.3 Mpa.
- Choose a convenient faucet to connect to the water supply system, add a disconnect faucet (for service/ repair purposes) and connect the water supply pipe to the water inlet. A pressure reducer must be installed to balance the water pressure up to 3 bar maximum
- Slowly open the water draining faucet, make sure that there are no leaks from connections and/ or from the device
- Make sure that the water flow from the faucet comes out without air bubbles and that the flow is stable.
- Water must be flowed inside the system to rinse the system before full use.
- After the water comes out of the faucets, the water/ cold water must be connected to the electrical system.
- If a water purification unit is installed, it must be recognized according to the attached
instructions.
Important: The filters must be washed before connecting them to the system. Note: If there is a combination of reverse osmosis then it should be connected to osmosis according to the instructions to prevent heat absorption from a nearby product.
Warning!!
To avoid notices from the Ministry of Health or the competent authority regarding sanitation, the drinking water must be disinfected according to the previously mentioned entity.
- It is mandatory to install a water pressure reducer before the system is installed. This reducer must not exceed 0.3 Mpa pascal/ 3 bar
- It is mandatory to install a filter to prevent bacteria accumulation in the system
- It is important to note that the pressure level may increase at night and on weekends, so it is mandatory to disconnect the device from the water and electricity when you are away from home for extended periods of time.
- It is necessary to replace the filters and wash the internal system every 6-8 months to prevent the accumulation of bacteria and dirt, it is also to keep the highest quality of the water.
- The installation of the device and the replacement of the filters can only be done by a certified technician on behalf of the company.
- The company is not responsible for any damage caused as a result of water pressure exceeding the required scale
- Any performance enhancing or tampering with the product other than by a qualified technician will void any warranty and acquired damage will be the sole responsibility of the customer.
- The customer’s liability will not apply when the installation of the water facility is carried out by another foreign installer.
Important Comments:
- A pressure reducer must be installed before connecting the water.
- The system must only be installed by a certified technician on behalf of the company.
- If the power fuse is worn out, it must be replaced only by a certified electrician approved by the customer.
- Do not remove the power cord to turn off or on the device. Only circuit breakers should be used.
- Do not clean the device with water to prevent electrical accident. It is recommended to clean the device with a damp cloth and then dry it.
- Do not allow small children to operate or have any access to the device.
- Do not move or tilt the device when it is connected to electricity.
- Do not tilt the device more than 45 degrees during transfer or installment.
- The system should be flushed during the first two weeks by emptying the water tanks 2-3 times a day to remove aftertastes (turn off the electricity via the power switch then empty the water in the tanks through the excess opening located on the lower back of the device.
- The company is not responsible for the device and any other damages if the device was not installed and routine maintenance isn’t performed by a certified technician on behalf of Havrah.
Saturday Use:
- Turn on Shabbat mode which is located on the upper left side of the water dispenser.
This mark will appear on the LCD screen.
 The preservation of hot and cold water will only be done if the cooling and heating switch is turned on and the LCD screen will
show the markings ‘cooling’ and ‘heating’.
If the heating and cooling switches are off, no temperature preservation operation will take place
and no marking will appear on the LCD screen
The preservation of hot and cold water will only be done if the cooling and heating switch is turned on and the LCD screen will
show the markings ‘cooling’ and ‘heating’.
If the heating and cooling switches are off, no temperature preservation operation will take place
and no marking will appear on the LCD screen
- In Shabbat mode, the water inlet to the hot water tank is closed and as long as the water dispenser is in Shabbat mode, no water will enter. The main heating element will not be turned on, but the secondary heating element only to maintain temperature will work. During cooling, the compressor will run for 5 minutes to cool the water and stop working for 30 minutes. In Shabbat mode, press any button and no function will activate and no sound will be heard.
- In Shabbat mode, cold water sensor and hot water sensor will not work.
- Shabbat mode can only be canceled by manually pressing the disable switch, any disconnection and restart of electricity will leave the device in its previous state.
- When switching from Shabbat mode to normal mode, the time settings will be saved in the memory unless the water dispenser is disconnected electronically and the time settings will reset/
- To switch to normal mode, press the switch.
Timing Function:
- After connecting the device to a power source, by default, the device is without a time visible. In order to determine a schedule for the water facility, the local time must be determined, after which 4 time groups must be determined for the water.
- Press the ‘Time’ button and then touch the ‘Set’ button, the LCD screen will display the ‘Clock direction’ indication (this indicator means that the water dispenser is now in the time setting), the 2 left numbers ‘88’ will flash, then press ‘up’ or ‘down’ arrows to set the hours. The range of hours is between 0-23. After finishing the hours press the ‘set’ button again, now the 2 right digits ‘88’ will flash, then press ‘up’ or ‘down’ to set the minutes. The range of minutes is 0-59. At the end of setting the desired time, press the ‘Time’ button and the time will be set.
- The first digit ‘A’ will become the digit ‘F’ and in this situation, the water facility will start working. To determine the start of its operation repeat sections 1 and 2.
- Pressing the ‘Time’ button will cause the symbol ‘A’ to become the number ‘2’ and now the time for stopping the facility will be defined. In order to determine the end of the operation of flow sections 1 and 2 must be repeated.
- By pressing the ‘Time’ button again, the number ‘8’ will become the number ‘3’ and a device activation timing operation will be performed in section 3.
- By pressing the ‘Time’ button again the number ‘8’ will become ‘4’ and a timing operation will be performed to stop the operation of the water facility.
- When finished, press the ‘Time’ button to save the settings of the 5 time groups. ‘Clock direction’ indication will not disappear, press the ‘Time’ button and the ‘Set’ button to switch between the time groups. If there is no action for 20 seconds in the setup mode the last mode will be saved automatically.
- When the timing function is on and the water dispenser is in the off timing mode, the screen lighting will not work, only the clock will appear on the screen and all functions will not be available for operation. When the water dispenser is in active timing mode at all the functions will be available.
- Water dispenser initialization- press and hold the ‘time’ button for 10 seconds, the water dispenser will now initialize itself. The time settings and temperature settings will be set according to the default.
Cooling:
- Turn on the cooling switch located on the upper rear side of the device, the inscription ‘Cooling’ will be displayed on the screen in the mode. This is when the compressor comes into the operation to cool the water and the indication will flash. When the cooling operation ends, the cold preservation mode will turn on and the mark will stop flashing and appear permanently.
- Setting cold water temperature: Press the ‘Set’ button and hold it for 10 seconds. The hot water
temperature will flash on the display, now press the ‘Set’ button again to switch to cold water, no
press ‘up’ arrow, ‘down’ arrow to set the cold water temperature, cold water options are displayed
on screen. . To set both 7, 15-111 will be displayed in the temperature setting
markings, click again to save the selection. (If there is no operation within 20 seconds in the
mode, the last state will be saved automatically.)
- When the user selects a marking of 2 small lines, 15℃ will be displayed on the LCD screen. When the user selects a marking of 2 medium lines, 11℃ will be displayed on the LCD screen. When selecting a thermostat at 7℃, a marking of 2 high lines will be displayed on the LCD screen. When selecting a water temperature, the desired one will be ticked until the water temperature that was selected when selecting the temperature and the marking will become static.
Fast Re-Heating:
Press the ‘Rapid Heating’ button to activate rapid heating. On the LCD screen the inscription ‘Rapid
Heating’ will appear. The marking will flash until the water temperature reaches 96 degrees and will
remain static, pressing again during process will cancel rapid heating.
Half/Full Tank Function:
The setting of the device when operating is a half tank of hot water and the half-tank mark will appear on the LCD screen. Pressing the full tank button ‘Half/full tank’ will appear on the LCD screen indicating a full hot water tank. Pressing the ‘Half/full tank’ button again will set the water to half a tank marking will appear on the LCD screen, meaning half of hot water tank.
Traditional and Modern Blend!
The Noga Shabbat Water Dispenser combines traditional needs with modern convenience. It’s a great investment for anyone!
High-Quality Build!
The build quality of the Noga Shabbat is top-notch. It’s sturdy and well-insulated, ensuring that water stays at the right temperature.
User-Friendly Design!
I Love the user-friendly controls on this dispenser. It’s perfect for anyone who needs a hassle-free way to enjoy water on Shabbat. I love this water dispenser. The best MayimH2O!
Sleek and Functional
The sleek design of the Noga Shabbat Water Dispenser complements my kitchen perfectly while providing great functionality.


WANT MORE FROM US ?
We are here to help and answer any questions you might have. We look forward to hearing from you. We will respond as soon as we can.